Setting Up a Survey
A survey allows you to solicit feedback about a user's satisfaction with the work that was performed once a request has been closed. This is done by adding a link to the request close notification email that prompts the user to take the survey. Surveys are extensively customizable. You can define how the survey is scored, what questions are asked, which types of requests generate surveys, what type of notifications are sent, at which properties a particular survey is used, and what is done in response to the survey results.
Surveys are created as a special case of an inspection, therefore, surveys are created using the same administration pages that are used to create inspections. Until you get comfortable creating surveys, this may seem confusing at first. Just remember, the terminology that refers to the "inspection" is, in this case, referring to the survey.
This tutorial guides you through the process of creating a survey, providing basic instructions and caveats that are particular to creating surveys. It does not take you step-by-step through each process, but it does provide links to the help pages that do. You should (and often must) perform these procedures in the order that they are presented in this tutorial. Some procedures are optional and are noted as such.
 Establish the Survey Scoring Type
The first step in the process of setting up a survey is to establish how the survey will be scored. There are many options for scoring a survey, for example, pass/fail, excellent/good/average/poor, or on a scale from 1 to 10. It is important to establish the appropriate scoring type for the survey, because once that is set, it cannot be changed.
You can either create a new scoring type or use a scoring type that was created for another survey. For more information about scoring types, see Inspection Scoring Types.
Create the Survey Class and Type
The next step in the process of setting up a survey is to create the survey itself. This is done by defining the appropriate survey class (or selecting one, if an appropriate class already exists) and then creating the survey type beneath the class.
A survey class is a high-level container for one or more surveys. Many of the parameters associated with a survey are defined at the class level, for example, the scoring type, a flag indicating if the class contains surveys or inspections, and scoring analysis information. Survey classes can contain survey types (the individual surveys) and survey items (the specific questions). You may want to create a specific class for your surveys to separate them from your inspections.
Survey Class
A survey class is a special case of an inspection class; therefore, it is created on the Inspection Classes and Types page. When creating a survey class, set the following parameters:
- Survey – Set the Survey field to Yes.
- Type and SubType – If you want to automatically generate a corrective work order in response to a survey failing to meet a certain score threshold, select the request type and subType for the work order to create.
- Benchmark – Benchmarks are associated with the Inspection Dashboard and are not used with surveys, so do not change the default 0 value.
- Threshold – If you want to send out corrective work orders in response to low survey scores, enter a threshold value that represents the minimum acceptable overall score percentage (for example, enter 75 for 75%). If a survey is taken and the resulting score is below the threshold, a work order of the type and subType specified above is automatically generated.
- Grading Scale and FCA – These values are used only with facility condition assessment inspections and do not apply to surveys. Do not select a grading scale value and set FCA to No.
- Send Notification – Select Yes if you want to send an email notification to the assigned user for any corrective work order. If you are not creating corrective work orders for failed surveys, set this value to No.
- Assessment – Select No. This value is only used when creating assessments.
- Calculate Score – Select whether you want an overall score calculated. Typically, this is set to Yes.
- Allow Inactivate – Select either Yes or No to indicate whether this inspection can be made inactive. Typically, this is set to Yes.
Survey Type
A survey type is a special case of an inspection type that is also created on the Inspection Classes and Types page. The survey type is used to group together set of questions that will be asked upon completion of a work request. Later, you will use survey rules to define which survey is sent out for each type of work, so create as many survey types as you feel is appropriate for the different types of work requests. For example, you may have a basic set of questions that you want to ask all users, but may want to add a couple of specific questions if the work was software installation versus snow removal.
When creating a survey type, you can set most of the parameters to any value that you feel is appropriate; however, since assets are not associated with surveys, you should set the Asset Reading value to No.
Create the Survey Items
The survey items are the individual questions that you will ask in your surveys. Survey items can be reused by multiple surveys, so you can create a question and ask it over and over again on many different survey types.
Since a survey item is a special case of an inspection item, survey items are created on the Inspection Items page. When creating survey items, follow these guidelines:
- Be sure to select the survey class that you defined above from the Inspection Class field to associate the items with the appropriate survey class.
- Add each question by entering it in the Add Inspection item field. You may want to phrase your item in the form of a question.
- Typically, you will let the Weight value for each question default to 100 so that each question carries equal weight in the overall survey score. If you want some questions to count more than others you can define the weights accordingly. Weight is a relative value, so to make a question twice as important, you could change the weight to 200.
- When you click the ADD button, the survey item is added to the list at the bottom of the page. You can further define the item once it is added to the list.
- If you are using area types, you can select a value from the Area Type field. Area types are used to group similar items together. For example, if you have four questions on timeliness and five questions on work quality, you could choose to group the items accordingly. Typically, most surveys are short enough that area types are not needed. However, if you do need to group your items, you can create the required area types on the Area Types page.
- Once a survey has been completed, a user can locate the survey using the Inspection module and examine the scores for each question on the Inspection Details page. For each item, a Create Request link is displayed that allows a work order to be manually created based on the answer to a particular question. The default type and subType for these manually created corrective work orders can be specified for each survey item by clicking the EDIT button and selecting a type and subType.
- The Other Options pane of the page allows you to copy the items from another survey class into this class by selecting a class in the Copy From Inspection Class field and clicking the COPY button. Doing so copies every item from the selected class into this class. This can be a useful shortcut if another survey class contains questions similar to the ones you want to ask. Once you have copied the questions, you can edit them or delete the ones you do not need without affecting the class you copied the items from.
Create a Survey Condition
Conditions define enumerated values that users can select for an inspection item in addition to scoring the item. Although conditions are not used with surveys, at least one condition must be defined for a survey to score properly.
Define a condition on the Inspection Conditions page by selecting the survey class and entering a value in the Add Inspection Condition field. You can enter any value, for example. "N/A." The value you enter will display on some inspection reports.
Associate the Survey Items to the Survey Type
Once you have defined the survey type and the survey items, you can associate the appropriate questions with the survey on the Associate Items to Types page. Since the survey types and items are both associated with the same survey class, you can associate them with each other, reusing them.
As the following picture illustrates, you can create several survey types and several survey items and associate them with each other.
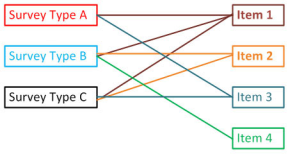
In this example, Item 1 is used with all three surveys, item 2 is used with Survey Type B and C, Item 3 is used with Survey Type A and C, and Item 4 is used only with Survey C.
When associating survey items to types, follow these guidelines:
- Select the survey class that you defined above in the Inspection Class field and then select the survey you want to define questions for from the Inspection Type field. Once you do so, all of the available items are displayed in the large list box.
- You can select one item or select multiple items using the SHIFT or CTRL keys and clicking ADD. The selected items display in the pane at the bottom of the page.
- You do not have to add the questions in any particular order. By changing the value in the Tab Order field, you can establish the order in which the questions will be listed on the survey.
- Clicking the Change to inactive link will temporarily prevent a question from being displayed on a survey but will retain the association. Clicking DELETE will permanently remove the question from the survey.
- Once you have associated all of your questions and defined the tab order, click UPDATE to save the associations. You can create associations for another survey by selecting it from the Inspection Type field.
Set Up the Survey URL, Link Text, and EMail Token
To include a valid survey link in close notification emails, you must define the survey URL, create the link to the survey and any accompanying text, and then edit the standard close notification email body text. These settings can be established globally for all properties or on an individual property-by-property basis.
Establish Survey URL and Survey Link Text
The survey URL establishes the web address users will go to when they click a survey link. The survey text defines the text that will be displayed in the close notification email and includes the link to the survey.
To establish these settings across all properties, this step must be performed by a super administrator. To establish these settings separately for each property, this step can be performed by any user with administrator permissions.
To establish the survey URL and survey link text:
-
Open the appropriate page.
- If these settings are being established globally, they must be set on the super administrator's Installation page. Open this page and expand the Survey Settings pane.
- If these settings are being established for a particular property only, open the Administration Menu page. Under the SYSTEM ADMINISTRATION heading, click Installation Options by Property. Click the SELECT PROPERTY button and select a property. Expand the Close Notification and Survey Text Settings pane.
-
In the Survey Link URL field, enter the following value:
/360LoginScreen.asp?SurveyID=
-
In the Survey Text field, enter the text you want to be added to the close notification email to suggest that the user take the survey. This text should include the appropriate anchor and href html tags (displayed in red) to create the link to the survey. For example:
Click <a href="%SurveyURL%">here</a> to complete the survey.
The user can only take the survey once. If a user attempts to click this link and take the survey a second time, an error message appears indicating that the survey has already been taken.
-
In the Survey Confirmation Text field, enter any text you want to display in the web browser after the user has completed the survey.
Edit the Close Notification Email
To include a link to the survey in close notification emails, the body of the standard close notification email must be edited to include a survey token. This token appends the survey text defined above to the end of the email. The survey text and link will only be displayed when the close notification email is for a request type/subType with which a survey has been associated using survey rules.
To include a link to the survey in close notification emails:
-
Open the Administration Menu page.
-
Under the SYSTEM ADMINISTRATION heading, click Installation Options.
-
Scroll down to the Close Notif Body field and enter the following email token at the end:
%Survey_Text%
-
Click UPDATE.
(Optional) Add a Survey Report Link to Corrective Request Notifications
If you are sending out corrective work orders in response to a survey not achieving the desired threshold score, you can include a link in the corrective request notification email to a report containing information about the corrective request, the survey results , and the original request to provide a more detailed context for the corrective work order.
Since this feature requires creating a user account and modifying core installation parameters, it can only be set up by a Super Administrator.
Create a Survey Report User
The first step in this process is to create a special survey report user account. This account will allow the recipient of the corrective request notification email to view the survey report, without requiring him or her to sign in to the system.
To create a survey report user:
-
Open the Administration Menu page.
-
Under the ADMINISTRATION heading, click Create a User.
-
Create the new user account, entering values into all of the required fields.
You may want to specify a name that identifies the purpose of the user account, such as "Survey Report User," but this is not required. You must make this user a Full User.
-
Click OK to create the user account.
The User Security page opens.
-
Click the Edit User link.
-
Scroll down to the External Employee ID field and enter SURVEYREPORT.
-
Click OK.
Edit the Default Message Body
The next step in this process is to add a token to the default email notification message to include a link for the survey report. To edit the default message body:
-
Open the super administrator's Installation page.
-
Open the Custom Email Settings pane.
-
In the Default Msg Body field, scroll to the bottom and add the following email token:
%Survey_Report%
-
Click UPDATE.
Turn Email Notification On
The final step in this process is to make sure that email notification is turned on for the corrective work orders generated in response to failing a survey. This is done by turning on notification on the survey's Inspection class.
To turn email notification on:
-
Open the Administration Menu page.
-
Under the INSPECTION ADMINISTRATION heading, click Inspection Classes and Types.
-
In the Inspection Class field, select the inspection class containing your survey.
-
In the Send Notifications field, select YES.
-
Click UPDATE.
Add the Survey to Your User Security Profile
Before you can associate the survey with particular types of work orders, you must have the survey added to your security profile as an inspection you can access.
Since this process requires modifying your user security profile, it can only be performed by a Super Administrator.
To add the survey to your user profile:
-
Open the Administration Menu page.
-
Under the ADMINISTRATION heading, click User Security
-
Click the SELECT USER button and select the user whose security profile will be modified.
-
Scroll down to the Inspection Classes pane and select the inspection class that contains the survey from the Add Inspection Class field.
-
Click ADD.
Create the Survey Rules
Survey Rules allow you to create a set of rules that associate surveys with request types and subTypes. This allows you to define which survey will be sent out for the completion of a particular type/subType of work. To define survey rules, you first create a survey control record and then create the rules that are associated with that record. The survey control record is then associated with all of the properties that should follow these survey rules. For more information about setting up survey rules, see Survey Rules.
Associate the Survey Rules With Properties and Spaces
Once you have created survey rules, you can associate them with the properties where you want them used. This can be done individually or regionally. Once you have associated the appropriate survey rules with a property, you can select the spaces within the property where you want the surveys to be used.
Set Survey Rules Individually
This procedure allows you to turn surveys on and set the survey rules for an individual property. To set survey rules for an individual property:
-
Open the Administration Menu page.
-
Under the ADMINISTRATION heading, click Edit a Property.
-
Click SELECT PROPERTY and select a property.
-
Scroll down to the Work Order Options pane.
-
In the Allow Surveys field, select Yes.
-
From the menu to the right, select the survey rules.
-
Click UPDATE.
Set Survey Rules Regionally
This procedure allows you to turn surveys on and set the survey rules for all properties in a region. To set survey rules for all properties in a region:
-
Open the Administration Menu page.
-
Under the INSPECTION ADMINISTRATION heading, click Survey Rules.
-
In the Survey Control Record field, select the survey control record the survey rules are associated with.
-
Click the Other Admin Options pane.
-
Select the Propagate this Survey Control Record to all Properties in this Region check box.
-
Click the Select link and select a region.
The survey rues will be copied to all properties in the region.
-
Select the Turn on Survey Flag for all Properties in this Region check box.
-
Click UPDATE.
Whether you set the Allow Surveys flag and survey rules individually or regionally, you must still set the Allow Surveys flag on each individual space for each property.
Turn Surveys on for Property Spaces
Once you have turned surveys on and selected the survey rules at the property level, you should designate whether you want surveys turned on or off in the individual spaces within each property. For example, if you have having a particular problem with tenants on the fifth floor, you may want to turn surveys on in that space.
Remember, that all properties have at least one space (the General space), so even if your property does not have several spaces defined, you must turn surveys on for the General space for any surveys to be sent. By default, surveys are turned off for all spaces.
To turn surveys on for property spaces:
-
Open the Administration Menu page.
-
Under the ADMINISTRATION heading, click Property Spaces/Floors.
-
Click Select Property and select a property.
All of the spaces that are defined for that property are displayed in a list at the bottom of the page. By default, surveys are turned off for all spaces.
-
For each space you want to allow surveys, do the following
- Click the Edit button.
- In the Allows Surveys field, select Yes
- Click UPDATE.
(Optional) Create Survey Notification
If you want to create property-level or region-level notifications whenever a survey is sent out, you can do so and select who should be notified. This is not frequently done, because it could generate a great deal of email. However, some installation may want to do so if they are monitoring a particular problem.
To set up notifications, open either the Inspection Notifications - Property page or the Inspection Notifications - Region page. Be sure to select the inspection class containing your survey when you click the Add Notification button. In the window that opens, you can select an individual survey to be notified about or make no selection so that notifications go out for all surveys in the class.